MEmu App Player
2016年1月28日星期四
FAQ - How to Get Help
#How to get help from MEmu more effectively?#
MEmu App Player is a brand new FREE internet product. During rapid iteration, we truly appreciate any of your feedback and endeavor to response as soon as possible.
Simply join our MEmu group and chat with CS representative at Facebook.
Facebook group: https://www.facebook.com/groups/memuplayer
Facebook page: https://www.facebook.com/memuplayer
In the sake of quick problem solving, we suggest you to collect a little more info when encountering severe problems. That would be very helpful for us to help you in time.
1. Click the System Info icon on the top right corner of MEmu and Save the table as a image file.
2. Save the latest log file from MEmu installation diretory in Windows. For example, it locates at C:\Program Files\Microvirt\MEmu\MemuHyperv VMs\MEmu\Logs if you are running MEmu.
At the end, you are welcomed to send any question or feedback to support@microvirt.com as well.
2016年1月26日星期二
2016年1月22日星期五
User Manual - Multiplayer Mode
#How to play Android game in multiplayer simultaneously?#
There are two shortcuts of MEmu App Player on your desktop after installation. One is MEmu, the other is MEmu - Multiple Instances Manager.
If you want to play Android games in multiplayer simultaneously (like Clash of Clans, Clash of Kings and Boom Beach), double click the shortcut to start MEmu Multiple Instances Manager. Click the Create button to create several instances of MEmu and run them as you want. Or you can clone an existing instance of MEmu by clicking the Clone button.
In theory, there is no limit on the number of running MEmu instances, as long as your PC’s hardware resource is capable to support, especially memory size. With this function, you can play different games or apps simultaneously.
Official Website: http://www.memuplay.com/
Online Support: https://www.facebook.com/memuplayer
User Manual - Restore User Data
#How to restore user data in Android Emulator?#
When re-install MEmu App Player, apps and user data will be refreshed along with Android image. With MEmu Multiple Instances Manager, you are allowed to backup/restore these data by simple two steps.
1. Click the Export button to backup your apps/data into a certain ova file.
2. Click the Import button to restore your apps/data from that specific ova file.
Note: The ova file is likely to be very large if you installed a lot of apps before, so the backup or restore process will be time-consuming.
Note: The online upgrade process of MEmu will remain the apps and user data.
2016年1月21日星期四
User Manual - Enable Hardware Virtualization
#How to enable hardware virtualization in Android Emulator?#
MEmu App Player will have better performance if hardware virtualization (aka VT-x) is enabled on your computer. Most of mainstream Intel and AMD CPUs support hardware virtualization. However, this feature is likely to be disabled by default for some reason. Here we recommend you to enable it by following steps.
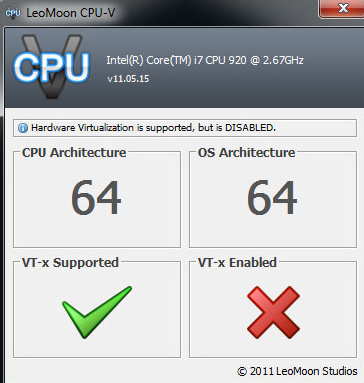
1. Check the status of hardware virtualization on your computer with a 3rd-party tool: LeoMoon CPU-V.
3. If CPU supports hardware virtualization but this feature is disabled, you will get the result as below.
Please refer to the following steps to enable this feature then:
3.1 You have to enable hardware virtualization in the BIOS. Press a designated key repeatedly to enter into BIOS setup page when boots up, look for Virtualization Technology (aka Intel VT or AMD-V), and then enable it. At the end, save and restart the computer to apply the change.
Note: The BIOS settings for Intel VT or AMD-V are usually in the Chipset or Processor menus. The menu names may vary from this guide, the virtualization settings may be found in Security Settings or other non standard menu names.
3.2 If you have some other virtual machine software in Windows, like Hyper-V, you’d better to make sure it’s turned off. Otherwise, hardware virtualization might be occupied exclusively.
4. If you get the result as below, it’s ready to go with hardware virtualization now.
Official Website: http://www.memuplay.com/
Online Support: https://www.facebook.com/memuplayer
MEmu App Player will have better performance if hardware virtualization (aka VT-x) is enabled on your computer. Most of mainstream Intel and AMD CPUs support hardware virtualization. However, this feature is likely to be disabled by default for some reason. Here we recommend you to enable it by following steps.
1. Check the status of hardware virtualization on your computer with a 3rd-party tool: LeoMoon CPU-V.
2. If CPU does NOT support hardware virtualization, you will get the result as below. That means nothing could be done in this part.
Please refer to the following steps to enable this feature then:
3.1 You have to enable hardware virtualization in the BIOS. Press a designated key repeatedly to enter into BIOS setup page when boots up, look for Virtualization Technology (aka Intel VT or AMD-V), and then enable it. At the end, save and restart the computer to apply the change.
Note: The BIOS settings for Intel VT or AMD-V are usually in the Chipset or Processor menus. The menu names may vary from this guide, the virtualization settings may be found in Security Settings or other non standard menu names.
3.2 If you have some other virtual machine software in Windows, like Hyper-V, you’d better to make sure it’s turned off. Otherwise, hardware virtualization might be occupied exclusively.
4. If you get the result as below, it’s ready to go with hardware virtualization now.
Official Website: http://www.memuplay.com/
Online Support: https://www.facebook.com/memuplayer
User Manual - Setup Joystick Mapping
#How to setup Joystick mapping in Android Emulator?#
In addition to keyboard, you can control your character with joystick easily. Please follow below steps to setup joystick mapping.
1. Connect the joystick to your PC and open the properties of this device.
3. Download JoyToKey_en.zip, unzip it and open JoyToKey.exe with administrator privileges. Press the buttons of joystick and make sure they response properly in the Joystick 1 tab.
Official Website: http://www.memuplay.com/
Online Support: https://www.facebook.com/memuplayer
In addition to keyboard, you can control your character with joystick easily. Please follow below steps to setup joystick mapping.
1. Connect the joystick to your PC and open the properties of this device.
3. Download JoyToKey_en.zip, unzip it and open JoyToKey.exe with administrator privileges. Press the buttons of joystick and make sure they response properly in the Joystick 1 tab.
4. Enter into a certain game and set keyboard mapping as usual.
5. Assign the buttons of joystick to the keyboard mapping accordingly one by one.
6. Save the assignments at the end.
Note: You can also map mouse operations with joystick if you want. The only difference is in step 5, assign the buttons of joystick to the mouse operations.
Note: Please make sure you launch JoyToKey.exe with administrator privileges.
User Manual - Setup Keyboard Mapping (incl. Gravity Sensor)
#How to setup keyboard mapping in Android Emulator?#
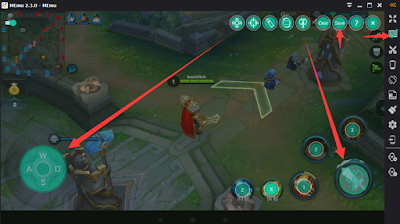
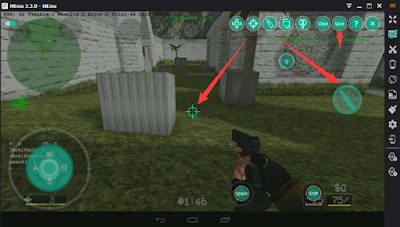
Click the Keyboard button on the side bar after you enter into a certain game. You may follow below steps to setup keyboard mapping for easy control.
1. Drag the WASD key to the place where the movement key spot locates on the screen.
2. Drag the Select & Attack key to the place where the attack key spot locates on the screen. As the name suggests, it acts as a combination of select and attack through right click your mouse. It’s normally applied in ARPG game.
3. Drag the Shoot key to the place where the shoot key spot locates on the screen. Drag the Shoot Perspective key to the place where the front sight spot locates. As the name suggests, Shoot and Shoot Perspective keys are normally applied in shooting game. Once saved, right click mouse to activate them in the game.
4. For accelerometer control, click the gravity sensor key and assign key to the direction of tilt. There are four directions supported and you may map them as needed.
5. For slide screen operation, hold the left mouse button down and drag the mouse pointer toward the direction of slide screen, then assign a key to map this operation. By the way, WASD key functions identically as slide operation in running games.
Note: When you want to type message in the game, click the switch on the top left corner or press shortcuts “Alt + A” to avoid keyboard occupation temporarily.
Note: You can also get help info about keyboard mapping in the MEmu by clicking the Help key.
Official Website: http://www.memuplay.com/
Online Support: https://www.facebook.com/memuplayer
Click the Keyboard button on the side bar after you enter into a certain game. You may follow below steps to setup keyboard mapping for easy control.
1. Drag the WASD key to the place where the movement key spot locates on the screen.
2. Drag the Select & Attack key to the place where the attack key spot locates on the screen. As the name suggests, it acts as a combination of select and attack through right click your mouse. It’s normally applied in ARPG game.
3. Drag the Shoot key to the place where the shoot key spot locates on the screen. Drag the Shoot Perspective key to the place where the front sight spot locates. As the name suggests, Shoot and Shoot Perspective keys are normally applied in shooting game. Once saved, right click mouse to activate them in the game.
5. For slide screen operation, hold the left mouse button down and drag the mouse pointer toward the direction of slide screen, then assign a key to map this operation. By the way, WASD key functions identically as slide operation in running games.
Note: When you want to type message in the game, click the switch on the top left corner or press shortcuts “Alt + A” to avoid keyboard occupation temporarily.
Note: You can also get help info about keyboard mapping in the MEmu by clicking the Help key.
Official Website: http://www.memuplay.com/
Online Support: https://www.facebook.com/memuplayer
订阅:
博文 (Atom)